Firmware: Build and simulation instructions
This page outlines the commands required in order to build or simulate your payload firmware within the EMP framework.
Note
This page has been written for people who already have payload firmware that is integrated into the EMP framework. If you are a new user building your payload firmware within the EMP framework for the first time, then you should follow the walkthroughs instead. If your project is set up to use the MP7 framework, and you want to migrate it to the EMP framework, you might want to go to the payload_firmware_mp7_migration page instead.
The prerequisites and steps 1 to 2 below are the same for building a bitfile and for simulating your payload; the commands in those two workflows are only different for step 3 (creating the project area, and running Vivado/ModelSim).
Prerequisites
You should create a working directory on a Linux machine which has Vivado
installed on it, as well as ModelSim for simulations. The machine should also
have Python and pip installed on it. In addition, in order for the TCDS2
functionality to be correctly implemented and for the command
ipbb ipbus gendecoders to run, uHAL needs to be
installed.
Build tool
The easiest way to build the framework firmware is to use IPBB; in case you
haven’t used it before, the IPBB primer
page gives a short introduction to IPBB. In order to run IPBB the package
python3-virtualenv (or python3-venv) needs to be installed on your
system.
IPBB can be downloaded as follows:
curl -L https://github.com/ipbus/ipbb/archive/dev/2026a.tar.gz | tar xvz
… and then you just need to source the env.sh script in order to add
the ipbb command to your $PATH:
source ipbb-dev-2026a/env.sh
# To run the ``ipbus gendecoders`` command later on
export PATH=/opt/cactus/bin/uhal/tools:$PATH LD_LIBRARY_PATH=/opt/cactus/lib:$LD_LIBRARY_PATH
Vivado
The framework firmware has been developed and tested with Vivado versions from 2021.2 to 2023.2
Step 1: Setup your IPBB area
You should begin by creating the IPBB work area itself, then download the
framework firmware and its dependencies. You need to be a member of the
e-group emp-fwk-users to download the EMP framework git repo and the
e-group cms-tcds2-users to download the TCDS2 firmware. You will
need to have a valid CERN Kerberos ticket on the machine on which you are
running IPBB; if you don’t then an error will appear during the ipbb add git
commands. You can change the URL prefix https://:@gitlab.cern.ch:8443 to
https://gitlab.cern.ch in order to use your CERN username and password
directly instead of Kerberos tokens.
ipbb init algo-work
cd algo-work
ipbb add git https://:@gitlab.cern.ch:8443/p2-xware/firmware/emp-fwk.git -b v0.10.1
ipbb add git https://gitlab.cern.ch/ttc/legacy_ttc.git -b v2.1
ipbb add git https://:@gitlab.cern.ch:8443/cms-tcds/cms-tcds2-firmware.git -b v0_2_1
ipbb add git https://gitlab.cern.ch/jfulcher/tclink-jhegeman-fork.git -d tclink -r 91d3db624a3914c566f63e49bc400ac08dc8bc46
ipbb add git https://gitlab.cern.ch/dth_p1-v2/slinkrocket_ips.git -b v03.12
ipbb add git https://:@gitlab.cern.ch:8443/dth_p1-v2/slinkrocket.git -b v03.12
ipbb add git https://github.com/ipbus/ipbus-firmware -b v1.14.1

# If using GBT/lpGBT cores, also run:
ipbb add git https://gitlab.cern.ch/gbt-fpga/gbt-fpga.git -b gbt_fpga_6_1_0
ipbb add git https://gitlab.cern.ch/gbt-fpga/lpgbt-fpga.git -b v.2.1
ipbb add git https://:@gitlab.cern.ch:8443/gbtsc-fpga-support/gbt-sc.git -b gbt_sc_4_3
ipbb init algo-work
cd algo-work
ipbb add git https://gitlab.cern.ch/p2-xware/firmware/emp-fwk.git -b v0.10.1
ipbb add git https://gitlab.cern.ch/ttc/legacy_ttc.git -b v2.1
ipbb add git https://gitlab.cern.ch/cms-tcds/cms-tcds2-firmware.git -b v0_2_1
ipbb add git https://gitlab.cern.ch/jfulcher/tclink-jhegeman-fork.git -d tclink -r 91d3db624a3914c566f63e49bc400ac08dc8bc46
ipbb add git https://gitlab.cern.ch/dth_p1-v2/slinkrocket_ips.git -b v03.12
ipbb add git https://gitlab.cern.ch/dth_p1-v2/slinkrocket.git -b v03.12
ipbb add git https://github.com/ipbus/ipbus-firmware -b v1.14.1

# If using GBT/lpGBT cores, also run:
ipbb add git https://gitlab.cern.ch/gbt-fpga/gbt-fpga.git -b gbt_fpga_6_1_0
ipbb add git https://gitlab.cern.ch/gbt-fpga/lpgbt-fpga.git -b v.2.1
ipbb add git https://gitlab.cern.ch/gbtsc-fpga-support/gbt-sc.git -b gbt_sc_4_3
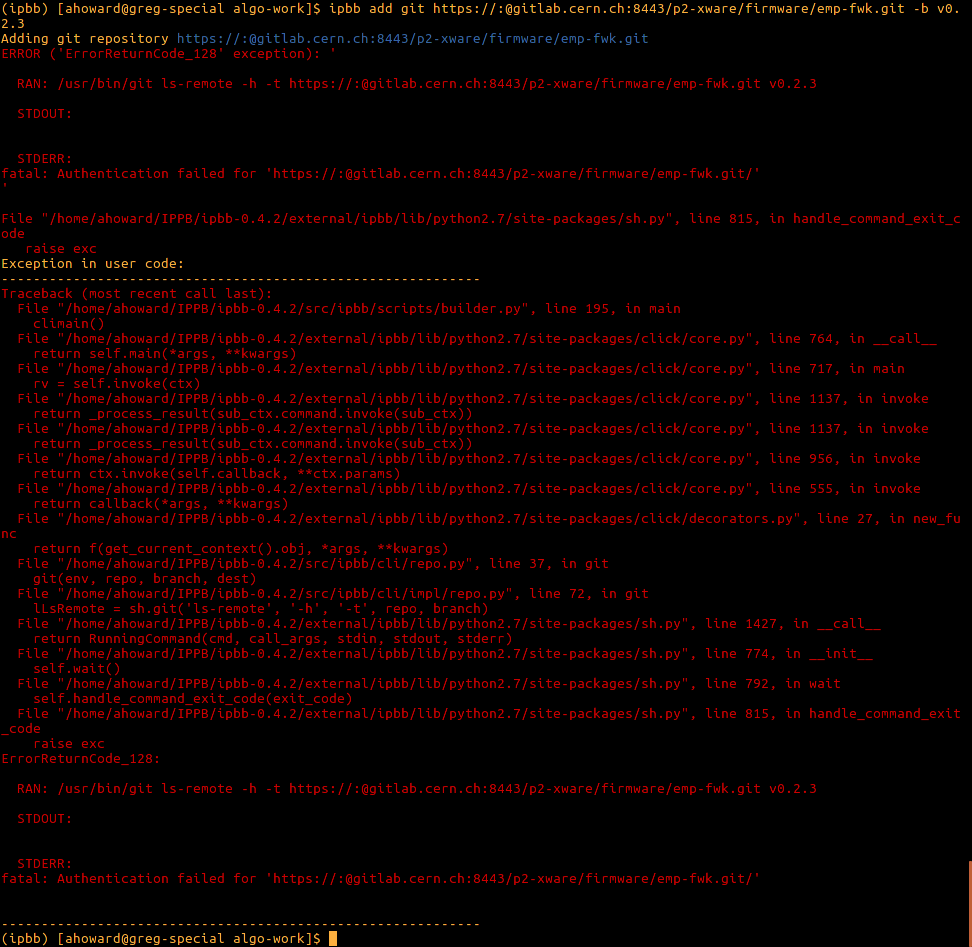
Fig. 1 Git authentication error with incorrectly set-up Kerberos tokens.
(A different name than algo-work can be used for working area as desired.)
Step 2: Add the payload repository
Add the repository containing your payload firmware to your IPBB work area by
running the ipbb add command again.
If you don’t already have a git repo and project, then you can create you own algorithm repository as described in Walkthrough1: creating your own repository from scratch.
Step 3: Build firmware or run simulation
The commands required for either building a bitfile or simulating your payload firmware are given below. Make sure that you have a valid Vivado licence (and ModelSim licence for the simulation workflow) in order for the commands to execute correctly.
Note
The top-level .dep file that you use in the following sections must
reference your files that implement:
The
emp_payloadentityThe
emp_project_declpackage
In addition to those files, your top-level dep-file must also reference
one of the board-specific dependency files under the boards/ area - e.g.
include -c emp-fwk:boards/vcu118
The expected emp_payload port map and the list of required constants
for the emp_project_decl package are specified in the
Payload firmware: Interface page.
Assuming that your top-level .dep file is located in source area
my-algo-repo, at path an-algo/firmware/cfg/top.dep, you
can create a project area (under directory proj/my_algo) by
running:
ipbb proj create vivado my_algo my-algo-repo:an-algo top.dep
cd proj/my_algo
Then, create the required TCDS2 XCI files (for TCDS2-related IP cores) by running:
../../src/emp-fwk/scripts/vivado_create_tcds2_ips.sh
Only four more commands are required to generate the address decoder
logic, setup the project, then build and package the bitfile (make
sure Vivado is correctly set in your $PATH):
ipbb ipbus gendecoders
ipbb vivado generate-project
ipbb vivado synth -j4 impl -j4
ipbb vivado package
During synthesis and implementation a number of checks are carried out, therefore you should make sure that the command is executed successfully before loading the bitfile on your FGPA. Also note that the synthesis stage may take 30-60 minutes to complete depending upon your machine.
Note
The top-level .dep file that you use in the following sections must
reference your files that implement:
The
emp_payloadentityThe
emp_project_declpackageThe
tb_declpackage
In addition to those files, your top-level dep-file must also reference
the top.dep dependency files from the boards/testbench directory, and
device.dep and packages.dep files from the board directory corresponding
to the hardware that you are targetting. Specifically, your top-level dep-file
should begin with include -c emp-fwk:boards/testbench top.dep
and end with include -c emp-fwk:boards/SOME_BOARD device.dep packages.dep
(you may need to add a suffix to the name of the packages depfile, if the
depfiles for multiple versions/variants of boards are stored in the same directory,
e.g. see projects/examples/serenity/dc_ku115/firmware/cfg/so1/testbench.dep).
The expected emp_payload port map and lists of required constants for
the emp_project_decl and tb_decl packages are specified in the
Payload firmware: Interface page.
Warning
Before running simulations, you should make sure that you’re using compatible versions of Vivado and ModelSim - see Xilinx AR68324 for the recommended combinations.
Assuming that your top-level .dep file is located in source area
my-algo-repo, at path an-algo/firmware/cfg/top_sim.dep, you
can create a project area (under directory proj/my_algo) by
running:
ipbb proj create sim my_algo my-algo-repo:an-algo top_sim.dep
cd proj/my_algo
You then need to create the simulation libraries as follows - by default,
the simulation libraries will be created under ${HOME}/.xilinx_sim_lib,
but they can be saved under another path by setting the IPBB_SIMLIB_BASE
environment variable, or by using the -x flag (e.g. -x /data/my-simlib-dir):
ipbb sim setup-simlib
ipbb sim ipcores
The ModelSim project should then be created:
ipbb sim generate-project
You can then run the simulation, in which data from input file <input.txt>
is fed into the algorithm, and the data captured from the output channels is
written to <out.txt>:
./run_sim -c work.top -Gsourcefile=<input.txt> -Gsinkfile=<out.txt> -do 'run 5us' -do 'quit'
The format for the input and output files here is the same as that used by the EMP software when injecting data into, and capturing data from, the input/output channels of EMP-based firmware running in an FPGA.
Note
The duration used in the last command (5 microseconds in the example given above)
should be at least as long as the amount of time that you want the algorithm to be
simulated (i.e. payload clock period multiplied by the larger of
(WAIT_CYCLES_AT_START + PLAYBACK_LENGTH) and
(WAIT_CYCLES_AT_START + CAPTURE_OFFSET + CAPTURE_LENGTH))